The rest of the lunch is fresh strawberry tomatoes (from the Farmer's Market, of course) and organic carrots with goma shabu dipping sauce (Japanese sesame sauce) in the little pig container, some organic green grapes (so sweet!) and string cheese. Simple and easy.
Join me as I explore the world of bento and make "food with a face" for my boyfriend, Mike.
Showing posts with label Eggs. Show all posts
Monday, August 5, 2013
Fancy Tea Sandwiches Bento Box Lunch
This weekend I took our niece out for tea, and it reminded me how fun and savory those little tea sandwiches can be! So I went all out and made herb butter with dill and chives to go on egg salad sandwiches with turmeric, celery seed and mayo/mustard, and prawn and dill sandwiches (also using the herb butter). They came out really cute and I'm totally making these for a picnic we're taking to a concert later this week!
Wednesday, April 17, 2013
Back to Basics - Simple Egg Salad Bento Box Lunch
After Monday's and Tuesday's crazy bentos, it was time to tone it back down and get back to 10-minute bento making! To be honest, this morning's bento took me more like 20 minutes because I had to make the egg salad, but if I had prepped it the night before, this would have totally been a 10-minute bento.
Although it's super fun to make bentos all creative and cute, the real point is to have a healthy, portion controlled, colorful and visually stimulating meal. I kept that in mind with today's lunch. Although all the components are simple, we have lots of color and a good balance of protein, fiber, and fruits/veggies.
On the left there's egg salad sandwiches with lettuce. On the right, we have celery sticks with peanut butter in my favorite panda container, blackberries, and sunflower seeds. I added fruit roll up flower garnishes to brighten up the box a bit.
REVIEW: Both Mike and I agreed that the blackberries have been delicious!! Just another reason why it's so important to eat fruit in season and local, if possible. It just plain tastes better.
Although it's super fun to make bentos all creative and cute, the real point is to have a healthy, portion controlled, colorful and visually stimulating meal. I kept that in mind with today's lunch. Although all the components are simple, we have lots of color and a good balance of protein, fiber, and fruits/veggies.
On the left there's egg salad sandwiches with lettuce. On the right, we have celery sticks with peanut butter in my favorite panda container, blackberries, and sunflower seeds. I added fruit roll up flower garnishes to brighten up the box a bit.
As a side note, I would like to say to whoever invented fruit roll ups - thank you! They are the perfect color splash to bento lunches. Tip: be sure to dry off your veggies or whatever you put fruit roll up flowers/stars/etc on, because if they are wet, they get all goopy. Ick.
And just a final close up pic of the blackberries, which are coming in season here, and look just delicious!
Friday, April 5, 2013
Friday Review - Flower Egg or Pancake Shaper!
Mike is sick today, so no bento. Instead, I made a "flower egg" for breakfast and took pictures so you can see how this product works! I'm apologizing in advance if the pictures seem poor; I couldn't really spruce them up since our laptop decided to go to laptop heaven. Hopefully we'll have a new one by the end of this weekend.
Today's review is on these silicone egg or pancake shapers. They come in lots of different shapes but we have a car and a flower. Silicone can handle heat up to 500 degrees and is easily washable, durable, and flexible. So these tend to be a little more forgiving then the metal shapers, especially if your pan isn't perfectly flat or is non-stick and you don't want to accidentally scrape it.
The little straight part coming off the side is the "handle," but luckily silicone doesn't really get too hot, so you can touch it even in the pan. This is another advantage of silicone over metal.
So the first and most important step is to oil your silicone shaper! I forgot to do this. Whoops. You'll see that you can still make a good shaped egg, it's just a little more delicate...anyways, oil your shaper lightly and then heat up your pan a little.
Put your shaper into the pan and crack an egg into it.
The silicone egg shapers are made for medium sized eggs - but most American eggs are large or jumbo! The sides aren't very high and a big egg will spill over. You can crack your eggs into a measuring cup and then just pour what you need into the shaper. I used our backyard chicken eggs, which are small and very firm, so I actually had to help this guy spread out a bit.
Today's review is on these silicone egg or pancake shapers. They come in lots of different shapes but we have a car and a flower. Silicone can handle heat up to 500 degrees and is easily washable, durable, and flexible. So these tend to be a little more forgiving then the metal shapers, especially if your pan isn't perfectly flat or is non-stick and you don't want to accidentally scrape it.
The little straight part coming off the side is the "handle," but luckily silicone doesn't really get too hot, so you can touch it even in the pan. This is another advantage of silicone over metal.
So the first and most important step is to oil your silicone shaper! I forgot to do this. Whoops. You'll see that you can still make a good shaped egg, it's just a little more delicate...anyways, oil your shaper lightly and then heat up your pan a little.
Put your shaper into the pan and crack an egg into it.
The silicone egg shapers are made for medium sized eggs - but most American eggs are large or jumbo! The sides aren't very high and a big egg will spill over. You can crack your eggs into a measuring cup and then just pour what you need into the shaper. I used our backyard chicken eggs, which are small and very firm, so I actually had to help this guy spread out a bit.
I like to flip my eggs, so I waited a bit and then flipped the whole thing over. After about 30 seconds or so, I turned off the heat and peeled off the silicone shaper, very carefully.
If you oiled yours, this part will be a lot easier and it should just lift off!
And then I peeled off the silicone edge, very carefully. If you oiled yours, this part will be a lot easier and it should just lift off!
This is when I flipped it back again. Then I plated it and ate it. Yum!
I imagine if you want to make pancakes, you can follow the same instructions, but using pancake batter. Don't forget that pancake batter puffs a little, so don't pour too much!
Thursday, March 28, 2013
Easter Duck and Bunny Sandwich Bento!
I put a little more effort into today's bento to make up for yesterday's quickie bento. Today we have a duck/chick tuna salad sandwich, and a bunny hummus and avocado sandwich. I used egg whites and nori for the eyes, fruit roll ups for the bunny nose/mouth, and carrot for the beak and feet. I also used the same cutters for the sandwich bread on the avocado, so that it would fit perfectly onto the bunny shaped bread. In retrospect, the bunny body looks a lot like a turtle, so I might have to try that sometime in the future! How fun would it be to decorate a turtle shell?
Since Mike's had two days of veggies, we went back to fruit for today. I had cut some Caracara oranges yesterday, and peeled a kiwi, so we have oranges, kiwi and pineapple, dressed up with a bunny pick.
Here's what it looks like all together:
I hope he likes it!
REVIEW: Hummus and avocado was a hit, probably because it's something new! And it was plenty of food. Yay.
Wednesday, March 27, 2013
Very Late Friday Review - Egg Molds
Finally, my "Friday" review on one of my bento products: Egg Molds. If you've googled bentos online, you've seen tons of pics of these molded eggs. They come in the shape of cars, fish, bears, bunnies, and there's even quail egg molds (although, it's so difficult for me to peel quail eggs that I don't personally think it'd be worth it). I bought these two as a set:
I found them pretty difficult to use. First, the egg needs to be hot in order to mold properly and not break/crack. Then, you have to peel it perfectly (while it's hot!), or there will be "pock marks" on your bunny/bear's face. You shove them into the egg mold, close the lid and snap them shut, then dunk them in cold water for 10-15 minutes.
Since Mike and I buy our eggs from a lady with backyard chickens, they are super duper fresh and are therefore awful to peel. Taste? Awesome. Aesthetics? Suck. The top layer of egg frequently sticks to the shell. We usually make egg salad if we hard boil them. We've tried every trick in the book to peel them (running cold water, putting them in the fridge overnight, etc), but it just doesn't work.
Therefore, I've rarely had the occasion to use these molds. In theory, they are great, but then again, how often are you really going to be giving your child a hard boiled egg to eat, plain? At least in my experience, I'm making a variety of things, such as deviled eggs, egg salad, putting it into tuna salad, egg sandwiches, whatever. It's rare where Mike would want to eat a whole, plain, cold, hard boiled egg.
So buy your bento items carefully. Spend your money on things you think you'll actually use frequently (in my experience this would be cookie/veggie cutters, an awesome paring knife, and a good frosting spatula for spreading PB&J).
I found them pretty difficult to use. First, the egg needs to be hot in order to mold properly and not break/crack. Then, you have to peel it perfectly (while it's hot!), or there will be "pock marks" on your bunny/bear's face. You shove them into the egg mold, close the lid and snap them shut, then dunk them in cold water for 10-15 minutes.
Since Mike and I buy our eggs from a lady with backyard chickens, they are super duper fresh and are therefore awful to peel. Taste? Awesome. Aesthetics? Suck. The top layer of egg frequently sticks to the shell. We usually make egg salad if we hard boil them. We've tried every trick in the book to peel them (running cold water, putting them in the fridge overnight, etc), but it just doesn't work.
Therefore, I've rarely had the occasion to use these molds. In theory, they are great, but then again, how often are you really going to be giving your child a hard boiled egg to eat, plain? At least in my experience, I'm making a variety of things, such as deviled eggs, egg salad, putting it into tuna salad, egg sandwiches, whatever. It's rare where Mike would want to eat a whole, plain, cold, hard boiled egg.
So buy your bento items carefully. Spend your money on things you think you'll actually use frequently (in my experience this would be cookie/veggie cutters, an awesome paring knife, and a good frosting spatula for spreading PB&J).
Tuesday, March 26, 2013
Easter Egg Bento
This morning I wanted to do something with Easter egg shapes, but my oval cutter is pretty small. So instead, I made mini tuna salad stuffed pitas, and decorated the tops with Easter eggs made from provolone cheese. One has cheddar polka dots (I think one dot fell off in this pic, whoops!) and the other has fruit roll up stripes. They came out really cute and I made very good use of all my fun silicone grass/leaves! If you put the tuna salad on lettuce or on the silicone grass directly, this lunch would be carb-less and gluten free.
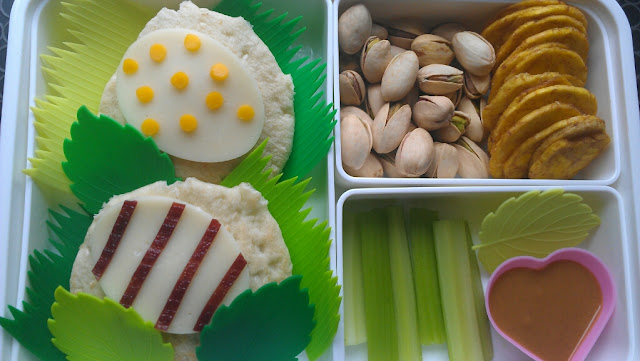
The rest of the box was a lesson in "speed" bento-ing - chopped up some extra celery leftovers from the tuna salad, put in a little container of peanut butter, and threw in pistachios and roasted plantain chips. Lots of protein, crunch, and healthiness today! If you have a little kid, you may want to invest in the tiny containers that have lids, for things like ranch dressing, peanut butter, etc. Luckily, I have a big kid who will transport this bento box safely to work.
As a side note, this bento took me 30 minutes this morning because I had to make the tuna salad (mayo, celery, relish, cilantro, pepper) from scratch. If I had made it last night, this bento would have taken me 10-15 minutes (the eggs took a little bit). If I had made the decorations last night, this bento would have taken 5 minutes or less! Prepping is key!
REVIEW: Not enough food! Which is weird because this is the large bento box. And, the mini pitas are not very good when cold. I've taken some myself, for lunch, and they are a little dry. Next time, we'll put the tuna separate so Mike can use the toaster at work for the pitas, or we'll just pair the tuna with crackers.
Wednesday, March 6, 2013
Getting Crazy With The Bento
I received some feedback from Mike about my past two lunches, so I'll post those as "reviews" to each post going forward, so we can keep a log of what works and what doesn't! :) I imagine this will be an ongoing learning process.
I made today's bento for Mike in a simplified way, just making the cute part the top! Here I've decorated chicken salad (with celery and carrots) with black sesame seeds (which add calcium, always a good thing) and red pepper letters. I kept it separated from the rest of the bento with carrot cut-outs that are pressed into the side (you can just barely see them). My chicken salad is not runny or drippy, so it should be fine.
Just in case, though, I put the fruit (blueberries and pineapple) into little silicon cups, with animal picks for easy eating. There's clementine segments at the back and sugar snap peas flanking the cups (it's important to make sure everything is pretty tightly packed so it travels well). I also made him a Greek yogurt/brown sugar fruit dip, which is in the dip cup in the back. This bento box is from the website Fab, which we love. It comes with two insertable containers that both have lids (only using one today), and the top, which locks down, also has a spot to store a fork. Perfect for today's lunch (which is gluten-free)!
The other little box has flower toasts with cream cheese sprinkled with chives, and a smoked salmon flower. They came out pretty cute and I would totally make these for an afternoon tea! Close up:
I made today's bento for Mike in a simplified way, just making the cute part the top! Here I've decorated chicken salad (with celery and carrots) with black sesame seeds (which add calcium, always a good thing) and red pepper letters. I kept it separated from the rest of the bento with carrot cut-outs that are pressed into the side (you can just barely see them). My chicken salad is not runny or drippy, so it should be fine.
Just in case, though, I put the fruit (blueberries and pineapple) into little silicon cups, with animal picks for easy eating. There's clementine segments at the back and sugar snap peas flanking the cups (it's important to make sure everything is pretty tightly packed so it travels well). I also made him a Greek yogurt/brown sugar fruit dip, which is in the dip cup in the back. This bento box is from the website Fab, which we love. It comes with two insertable containers that both have lids (only using one today), and the top, which locks down, also has a spot to store a fork. Perfect for today's lunch (which is gluten-free)!
I also made a lunch for my coworker, whose birthday is this week and I am missing her birthday dinner celebration. She loves Asian food so I made her a soba noodle nest (soba noodles are Japanese buckwheat noodles that can be eaten cold or hot) with quail eggs, and those are shitake mushroom slices I tucked into the corners, for added sustenance. On the side is a salad with tomato hearts, star carrots, and little red bell pepper pieces for color.
My own lunch was a pocket sandwich with turkey, smoked gouda and cucumbers. I learned you should not overstuff pocket sandwiches...and maybe just put the cheese on top as a decoration. It's much better that way. My pocket sandwich wouldn't stay sealed. I also made myself a fruit salad with yogurt dip - yum. Very colorful and cute even without fun shapes:
Whew! That's it for today. It did take me awhile to prep stuff last night because I made three different bento lunches with completely different items. That will be the last time I do that! From now on Mike and I will eat similar or the same food each lunch, which will make the lunches quicker and easier.
REVIEW: Mike ate everything in his lunch except one cup of blueberries (there were two). So it was a success! My coworker loved her lunch, too, but wasn't able to finish all the noodles - too many. I used one serving size (they come packaged that way) of noodles, which I usually eat for lunch alone, so with all the sides I think it would be best to cut down the amount of noodles and maybe add more condiments, like nori seaweed or an extra egg.
Subscribe to:
Posts (Atom)


